Discovery Series II (1999-On) Trailer Wiring Kit (Flat Four Plug)
Applies To:
Item: 9439C
Fits: Discovery Series II | '99 - '04
Specifications:
Application: Discovery Series II Vehicles; model years 1999-Present
Stop and turn functions rated for up to 5 amps.
Taillight function rated for up to 6 amps.
An Atlantic British Exclusive! We've specially-developed this trailer wiring kit for Discovery Series II vehicles. This quality harness kit is dependable and costs a fraction of the genuine version. If features a rubber plug cap to protect your exterior trailer plug from the elements and features easy plug-and-play installation. Follow the basic instructions below to install your wiring harness in minutes!
1) Remove right rear tail lamp assembly by removing the lamp's four mounting screws and gently slide lamp assembly out; allowing the lamp assembly to hang over bumper.
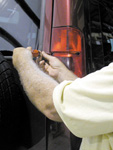
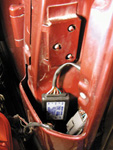
2) At the bottom of the recessed tail lamp cavity, locate your vehicle's gray trailer plug. It is mounted on a bracket with a black rubber boot covering it.

Vehicle Wiring Plug with Black Rubber Boot Cove
3) Remove the plug's boot cover and plug the matching connector of the trailer harness into it (Note: For the old-style device--see front label on wiring box for plug side noted with arrow and 'Tow Vehicle'.)
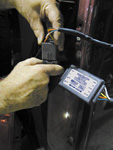
4) Feed the flat four plug end of box wiring (Note: For the old-style device--it is noted on box label as 'Trailer') down through the body opening at the bottom of the tail lamp cavity. Plug and wiring should feed out behind the right side of the bumper.
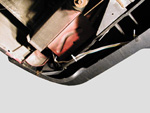
Wiring from Box Feeds Through Hole in Bottom of Tail Lamp Cavity.
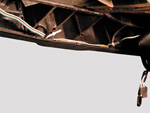
5) Route the box wiring along side of the right bumper lights wiring. Then along the bumper towards the trailer hitch, threading the wiring behind the bumper cover supports toward the center of the bumper.
Secure Box Wiring to Right Bumper Light Wires with Nylon Ties.
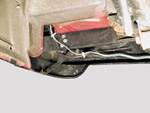
6) Secure the box wiring to the right bumper lights wiring and the bumper cover supports using the supplied nylon tie straps. Also secure end of wiring to the hitch if desired.
Secure Box Wiring to the Bumper Supports Towards the Center of the Bumper with Nylon Ties.
7) Fasten the converter box to body using the attached foam tape on back of box. You will find a flat spot on the body at the bottom of the tail lamp cavity.
8) Replace the tail lamp assembly and re-tighten lamp assembly screws.
Troubleshooting:
If your lights are not working properly, check the following:- First, check all plug fittings to ensure they are secure.
- Next, check your bulbs and replace any that are burnt out.
- If you trailer lights are still not working properly, you will need to test your trailer's wiring, plugs and lamp fittings with an automotive circuit tester (or have your mechanic do this) to identify and replace any faulty or shorted wires or trailer plugs.


